CAD/BIM Tips & Tricks
Understanding Revit Families and How To Use Them
28 May 2024
If you’re relatively new to Revit® families or just want to become more expert in them, this one’s for you. You know how human families can be tricky, difficult, frustrating and a downright pain in the you-know-what? It’s the same in Revit, although in the case of Revit, acquiring an understanding of families and how they work might sometimes be easier than dealing with your bloodline (maybe).
The Family Tree
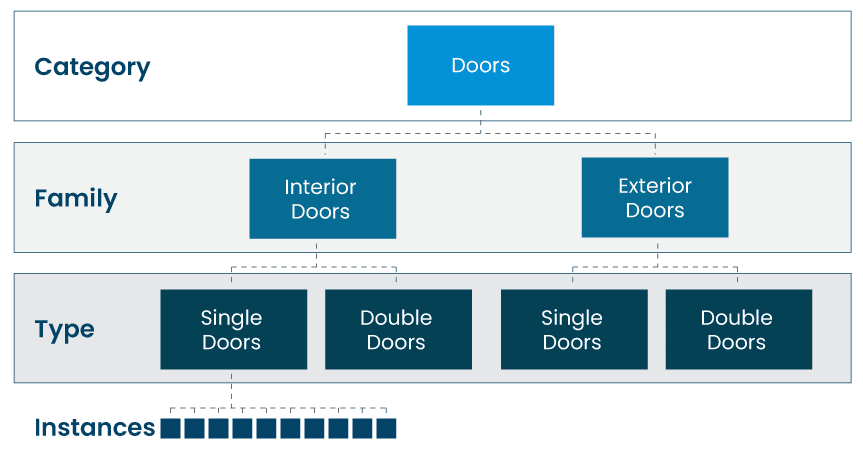
Let’s start with the essentials. One way or another, almost everything in Revit is part of a family and falls within a clearly defined hierarchy. The graphic below explains the hierarchy visually, using doors as an example.

Categories
At the top of the hierarchy, you have categories, which are pre-defined within Revit. Categories are the main organizational structure for families in Revit. They include high-level classifications of objects found inside buildings. Categories include items such as walls, windows, doors, ducts, pipes, structural columns and so on.
It’s important to note that there are a couple of different classifications of categories, but the primary two are the model and annotation categories, as explained below.
Human families can be tricky, difficult, frustrating and a downright pain in the you-know-what. It’s the same in Revit.
The model category includes the above-mentioned objects such as walls, floors, doors, stairs and beams — in other words, the physical components of the model. When someone talks about categories in Revit, this is generally the category to which they’re referring.
The annotation category, as the name implies, includes items such as text, dimensions and tags. Think of annotations as sticky notes attached to the components in your model. In other words, they’re the labels that explain or add extra information to the physical objects.
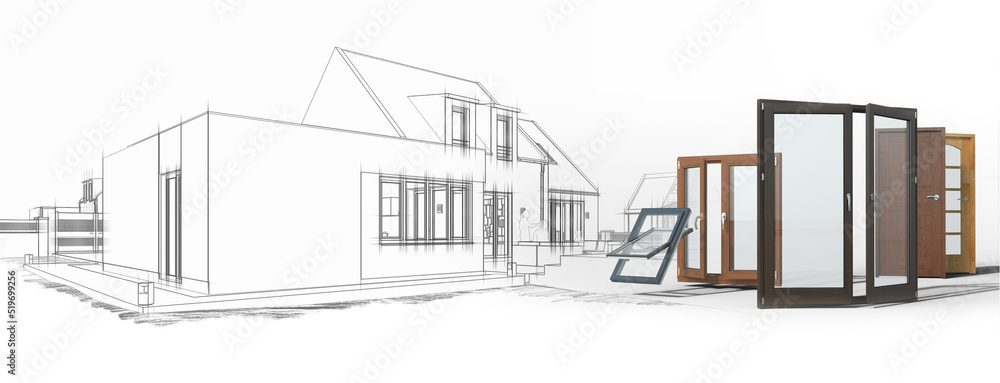
Categories tend to be pretty broad. Simply having a “windows” or “doors” category would be horribly inefficient, since each category has so many variants. Users would be forced to scroll forever to find what they need. So, to refine the category further, the next level down in this hierarchy is the family.
Welcome to the Family
Every element you will place in a model belongs to a family. Simply think of a Revit family as a collection of similar items that share the same general look or behavior. So, we selected the category of “Doors,” and now we go to families to find, for example, one made from wood, glass, metal or cookie dough. (Just making sure you’re still with us!) While the overall category is “doors,” at the family level, we’re starting to refine it. Do you need a single door? A double door? With or without transom? With or without sidelights? A garage door? Interior? Exterior? You get the idea.

Define and refine the components you need in Revit families.
So far, this hierarchy has been straightforward: from categories down to families. Now, as sometimes happens in real families, there’s a division. At this level, a family may branch into one of three different kinds, as determined by their behavior. Just as there was more than one kind of category, there is more than one kind of family. There’s the system family, the component family and the in-place family. We’ll introduce them all, so let’s keep going.
System families are pre-defined and include anything that is built into the software. They cannot be changed or manipulated by the user in the interface. System families may include model components such as walls and floors, but may also include project and system settings.
System families cannot be created or deleted. They are permanent members of the family tree that can never be disowned. But most system families have more than one variable, which results in the next level down on the hierarchy: the type. (See the “What’s Your Type?” section below.) What do system families mean in terms of practical application?
Because of their reusability, component or loadable families are the preferred type for most Revit projects.
Let’s say you’re looking at wall families. You can’t create or delete them, but you can add, delete or edit the types associated with the various provided wall families. Per Autodesk®: “For example, ‘Basic Wall’ is the most common wall family. In the out-of-the-box template files, there are several predefined Basic Wall types such as: Exterior — Brick on CMU [Concrete Masonry Unit], Generic 6” and Interior — 5 ½” Partition (1hr) [Refers to 1-hour fire-rated drywall.] The Basic Wall definition simply means that it is a layered wall that has the same structure along its entire length and height. The actual make-up of this structure can vary widely from type to type as the names noted here imply.” That’s the system family in a nutshell.
Next up are component or loadable families. They include pretty much everything that is not a system family. Many component families are model elements, but they may also be annotations or some other non-element as well. You can freely create, delete and modify component families and all their associated types. You would do this in the Family Editor, saving each family you created to its own unique file with an RFA extension.
Much like system families, component families may contain more than one type. They may also have instance parameters that differ from instance to instance, and unlike system families, they are completely customizable by the end user. (See the “Understanding Instances” section below.)
Lastly, there’s a third type of Revit family known as the “in-place family.” Similar to component families in terms of creation, editing and strategy, per Autodesk an in-place family “is created directly within a project (not in a separate family file as component families are) and it cannot be exported to other projects. Further, you can create in-place versions of many system family categories like walls, roofs and floors. This capability allows the creation of custom or free-form shapes not otherwise possible in pre-defined system families.”
Basically, in-place families are created inside a Revit project and are not reusable in other projects. Component or loadable families, on the other hand, are created in a separate file and can be loaded into multiple Revit projects. Because of their reusability, loadable families are the preferred type for most Revit projects. In-place families, however, are ideal for custom gutters, special trim unique to the project, or items such as custom built-in furniture.
And there you have it, an explanation of Revit families that proves they can be as easy or complex as real families.
What’s Your Type?
We’ve already mentioned that families can contain types, but what exactly is a Type? Autodesk defines a Type as follows: “A Type is a saved and named collection of values for the parameters within a family. Each Type has specific parameters that are constant for all instances of the Type that exist in your model; these are called Type Properties. Types have other parameters called Instance parameters, which can vary in your model.”
Think of a type as a collection of variables such as sizes, materials or other settings. A type offers a convenient way to change several variables of a family at once. A family can contain more than one type and each type may have its own user-editable settings. As a bonus, you can add as many types as you want, adding them either within the Family Editor or in the project.
Simply having a “windows” or “doors” category would be horribly inefficient, since each category has so many variants.
Understanding Instances
By now, you’ve probably noticed that each successive level in the Revit family hierarchy is about refinement, definition and detail. Instances are the final hierarchy of refinement and the easiest way to explain instances is with
an analogy.
Starting at the top, let’s say the category is beverages. The family is fruit juice. The types include pint, quart, half-gallon and gallon sizes. The instances are your flavors: apple, orange, mango and piña colada. (What do you mean piña colada isn’t a fruit juice? Of course it is. It’s mostly pineapple juice, for heaven’s sake.)
Overall, consider Revit families as the fundamental building blocks for creating Revit models. They are simply components — sometimes reusable — that can be refined and inserted into your projects.
By now, you’ve probably noticed that each successive level in the Revit family hierarchy is about refinement, definition and detail. Instances are the final hierarchy of refinement and the easiest way to explain instances is with an analogy.
Starting at the top, let’s say the category is beverages. The family is fruit juice. The types include pint, quart, half-gallon and gallon sizes. The instances are your flavors: apple, orange, mango and piña colada. (What do you mean piña colada isn’t a fruit juice? Of course it is. It’s mostly pineapple juice, for heaven’s sake.)
Overall, consider Revit families as the fundamental building blocks for creating Revit models. They are simply components — sometimes reusable — that can be refined and inserted into your projects.
How to Create Revit Families
While Revit provides a library of families, you can also create your own families using Revit’s built-in Family Editor. The Family Editor allows you to create 2D and 3D geometry, as well as specify parameters that control the family’s appearance and behavior. Here’s a general walkthrough of the process of creating a Revit family:
- Define the Kind of Family: The first step is to decide what kind of family you want to create. This could be anything from a simple door or window to a more complex piece of furniture or equipment.
- Sketch the Geometry: Once you know what type of family you want to create, you can start sketching the geometry in the Family Editor. You can use a variety of tools to create 2D and 3D geometry, including lines, arcs, rectangles and sweeps.

Structural engineers are responsible for ensuring that a structure is strong, safe and enduring.
- Add Parameters: Parameters are a powerful feature of Revit families that allow you to control the family’s appearance and behavior. For example, you could create a parameter for the width of a door or the height of a window. Parameters can be numbers, text or even formulas.
- Apply Materials and Visibility Settings: Once you have created the geometry and added parameters, you can apply materials and visibility settings to the family. Materials control the appearance of the family in the model, while visibility settings control whether or not the family is visible in different views.
- Load the Family: Once you have completed creating the family, you can load it into your Revit project. You can load families from a variety of locations, including the project file, a shared library or a separate family file.
Tips for Organizing Revit Family Libraries
Here are some handy tips for organizing your Revit family libraries:
- Group your families by category: This will make it easier to find the families you need. For example, you could create folders for architectural families, structural families, mechanical families and so on.
- Use a naming convention that is clear and consistent: This will also help you find the families you need. For example, you could use a naming convention that includes the category, family name and type.
- Regularly purge unused families from your libraries: This will help to keep your libraries organized and efficient.
- Include families developed internally in your library: This will ensure that these families are always available to your team members.
- If possible, restrict users from downloading families from external sources: Downloaded families may be corrupt or contain malicious code.
- If users must download families from the internet, verify and clean them before loading them into your project: Clean a family by deleting useless parameters, types and subcategories and making sure materials are set
by category. - Consider using cloud-based plugins like AVAIL™, UNIFI Labs® or Kinship to manage your Revit family libraries: These can be used to manage loadable families, system families, details and legends.
By following these tips, you can create and manage Revit families more effectively and improve the overall efficiency of your Revit projects.
How to Find Revit Families
There are several ways to find Revit families:
- You can search for a family in the Project Browser if you know the name of the family (or at least part of the name).
- If you’re unsure of the name but you know the category, you have the option of browsing families by category in the Project Browser.
- You can download families from the Autodesk Revit Library, which contains a collection of high-quality families created by Autodesk.
- Additionally, many third-party websites offer Revit families. However, it’s important to avoid using downloaded families from unknown sources since, as previously stated, they may be corrupt or contain malicious code.
- You can also create your own families using Revit’s built-in Family Editor.
Each successive level in the Revit family hierarchy is about refinement, definition
and detail.
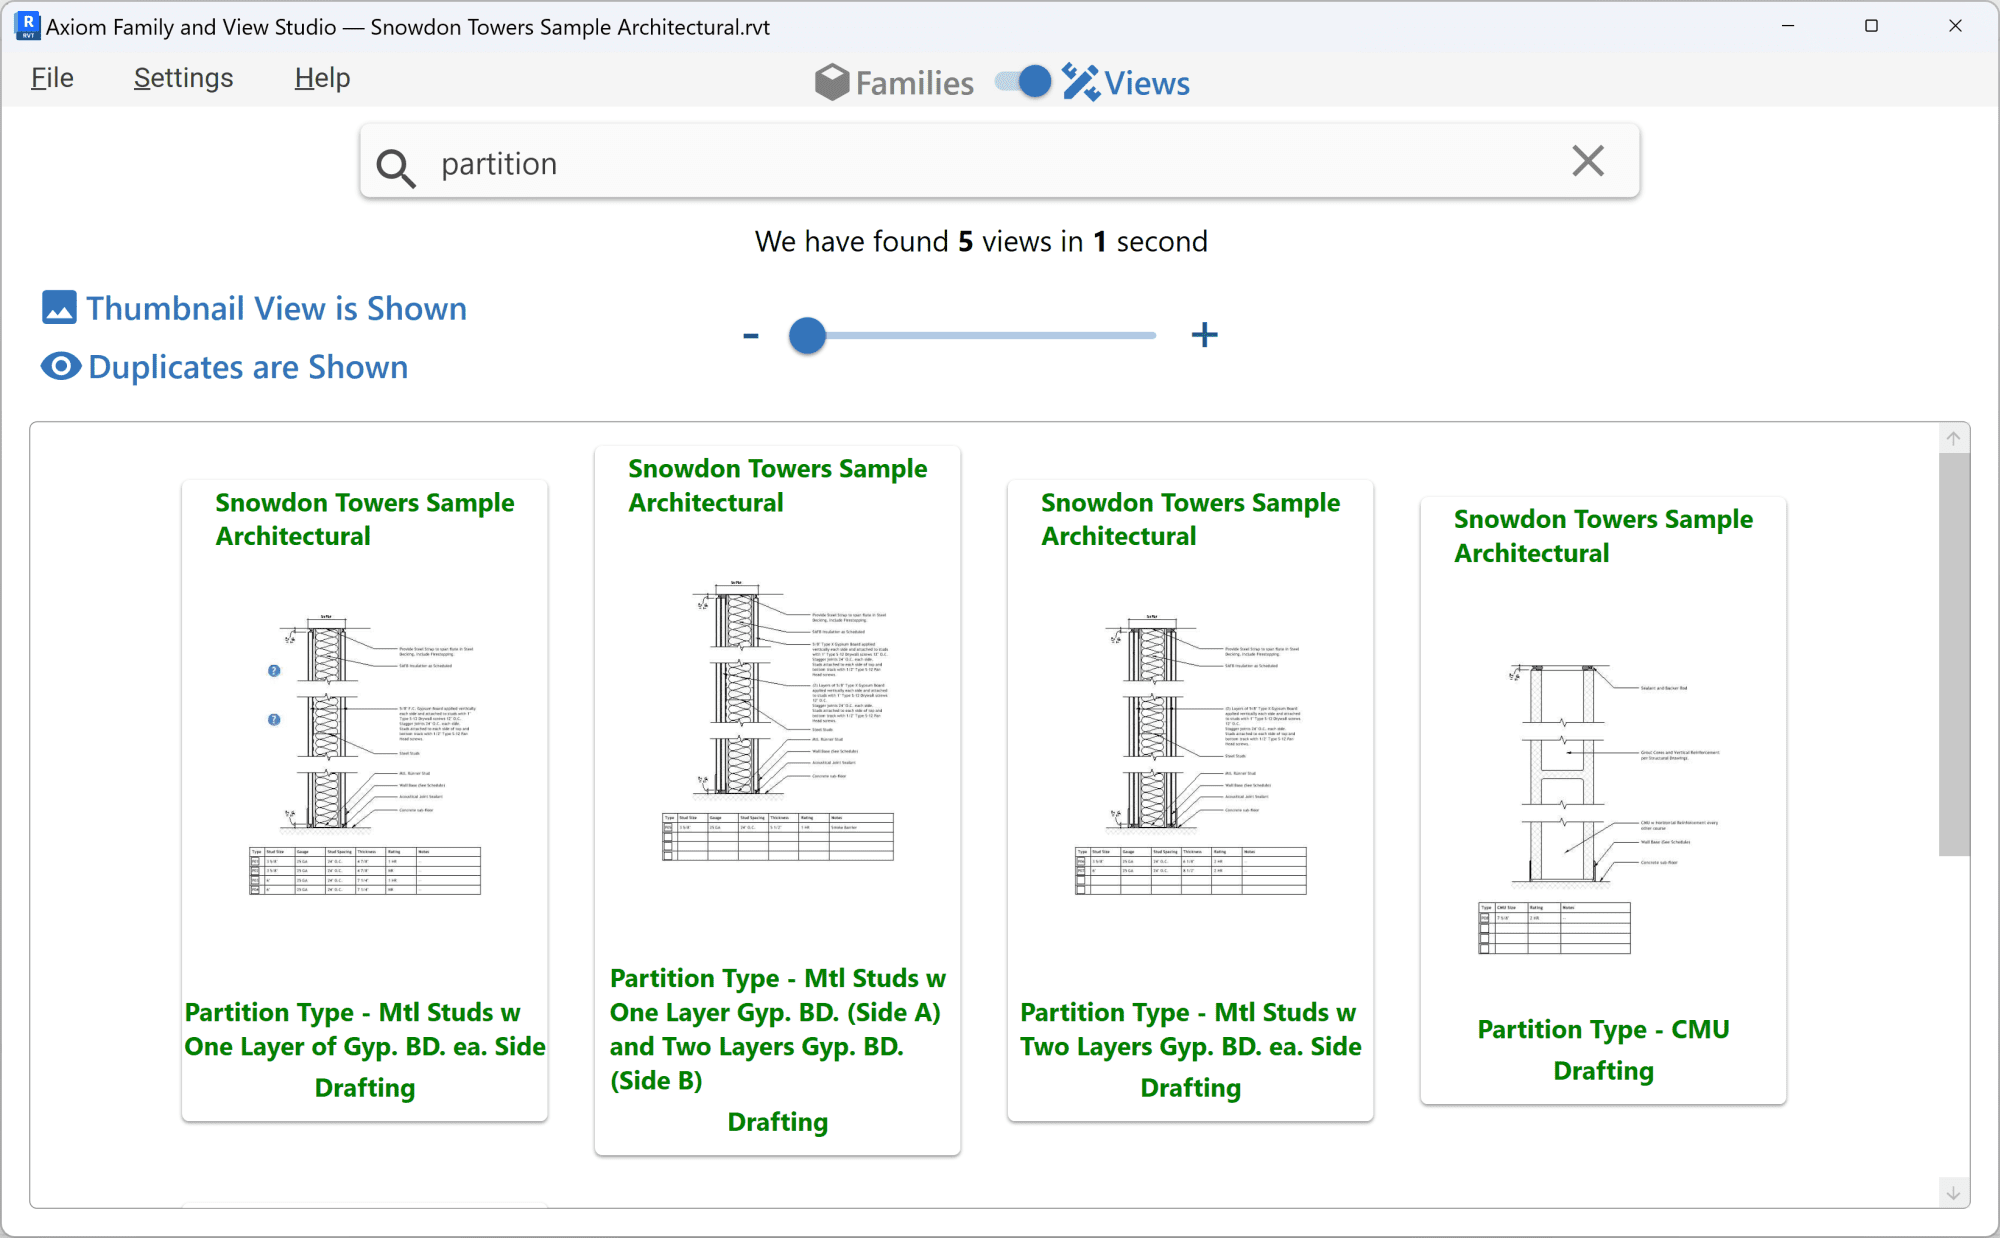
Hint: Speed up the process of finding a family with Axiom’s Family and View Studio™.
Time-Saving Revit Tools
By following these tips, you can create and manage Revit families more effectively and improve the overall efficiency of your Revit projects.
Another way to improve efficiency is by using Axiom’s productivity-boosting tools for Revit. Family and View Studio, for example, offers several benefits:

Family and View Studio saves tons of time when working with Revit families and views.
- You can see, at once, all the families or views that match your search, instead of looking through families or views one at a time.
- You can search for and display only the families or views that match your search criteria instead of displaying everything that is even a vague match.
- You can use the powerful and focused search capabilities to find families and views outside of your active Revit project and easily load them.
- Once you’ve found a family, you can easily place or duplicate and rename the family type.
- You can use the large thumbnails of views to easily determine which is the one you want.
- Once you’ve found a view, you can easily place it in your project.
- And much more.
A free trial is available for Family and View Studio so that you can discover just how much time you can save. For more information, visit AxiomInt.com or call a CAD/BIM Consultant at 727-442-7774 to get any questions answered.
